Enquiry - 5 Minutes Tutorial - Java SDK
Prerequisites
The following information is required to be able to integrate with Authologic:
- Developer portal credentials,
- API Keys.
Developer Portal Credentials
The developer portal address and credentials were provided during onboarding.
Passwords And API Keys
During the onboarding you have received the API keys:
- API key allowing communication with Authologic.
- The key used to verify the data sent by Authologic by the callback mechanism.
Integration Overview
The entire process is called conversation. The following diagram represents the process logical flow:
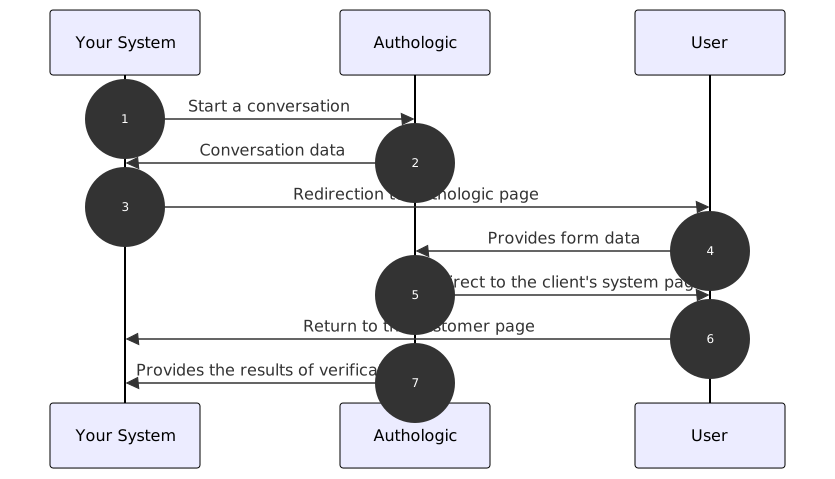
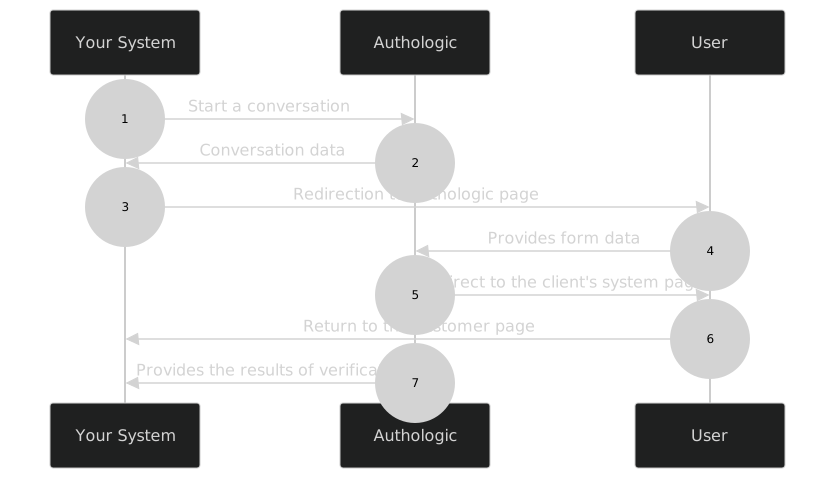
- Start of the identity verification process. Your server calls the API method called: POST /api/conversations
- The response returns information about the address to which the user should be redirected
- Your system redirects the user's browser to the above URL
- The user fills the form data
- Authologic redirects the user's browser to a predefined page of your system
- Your server displays the return page
- Authologic calls a callback on your server's side with the result of the filled form
One API for multiple online identity verification methods written in Java.
Installation
The installation of the library is as simple as including it as one of the projects dependencies.
We encourage to use the newest version of the library as we are constantly expanding our product offering and the underlying functionalities.
Maven
Include the following dependency in your pom.xml file to use Authologic Java SDK:
<dependency>
    <groupId>com.authologic.client</groupId>
    <artifactId>authologic-client</artifactId>
    <version>0.2.42</version>
</dependency>
Gradle
Include the following dependency in your build.gradle file to use Authologic Java SDK:
implementation("com.authologic.client:authologic-client:0.2.42")
Usage
The following example demonstrate an example on how you can use the Java SDK to interact with the Authologic APIs.
Creating Conversation
To start a new conversation process, which is the main entry point for the identity checking product the following example can be used:
import com.authologic.client.api.*;

import java.util.Arrays;

public class Main {
    public static void main(String[] args) {
        Client client = ClientBuilder.builder("username", "password").sandbox().build();

        Conversation conversation = client.execute(
            Requests.
                createConversation().
                strategy("public:enquiry").
                callbackUrl("some_callback_url").
                addProduct(
                    ProductQueries
                        .enquiry().withForm("c1655381-b8c9-4598-b861-a6c4ac805504")
                )
        ).get();

        System.out.println(conversation.getUrl());
    }
}
Creating the Client Instance
We start by creating the Client instance:
Client client = ClientBuilder.builder("username", "password").sandbox().build();
API credentials can be generated via OmniPanel.
Because the API is secured you need the provided credentials to be able to interact with it.
Once initialized the Client instance may be used to interact with the Authologic API.
Creating the Conversation
Next we can create the conversation and request the form with the provided identifier. For
that purpose we use the Requests.createConversation() using the following code snippet:
Requests.
    createConversation().
    strategy("public:sandbox").
    callbackUrl("some_callback_url").
    addProduct(
        ProductQueries
            .enquiry().withForm("c1655381-b8c9-4598-b861-a6c4ac805504")
    )
We set:
- the strategy
- the callback URL
- the product that we want to use
The strategy is the information that tells Authologic how to perform the operation.
The field is optional, but you can explicitly provide the information to choose the strategy that
you want to use. In the above example we used the public:enquiry, a strategy which doesn't perform
anything apart from displaying the requested form and gather the data without additional workflow
steps.
The callback URL is the URL that Authologic will send the user when the process, in our example case the identification process, will be completed. You should set it to match return to your application or use a service like Webhook Site(opens in new tab) if you plan on testing the SDK.
The product that we want to use is the Enquiry product, which allows us to specify the form that
will be displayed to the user in order to gather custom data. In our example we request a form with
the identifier c1655381-b8c9-4598-b861-a6c4ac805504 which needs to be defined upfront.
ProductQueries
    .enquiry().withForm("c1655381-b8c9-4598-b861-a6c4ac805504")
The identifier is optional and when not provided the form that was marked as default will be used. In such case the code would look as follows:
ProductQueries
    .enquiry().withDefaultForm()
As the final step we print the URL of the created conversation to the standard output to be able to continue the process. If you are trying out the SDK head to the returned link to fill out the data that will be returned as test data for your identity verification test.