Identity - 5 Minutes Tutorial - API Integration
Prerequisites
The following information is required to be able to integrate with Authologic:
- Developer portal credentials,
- API Keys.
Developer Portal Credentials
The developer portal address and credentials were provided during onboarding.
Passwords And API Keys
During the onboarding you have received the API keys:
- API key allowing communication with Authologic.
- The key used to verify the data sent by Authologic by the callback mechanism.
Integration Overview
The entire process is called conversation. The following diagram represents the process logical flow:
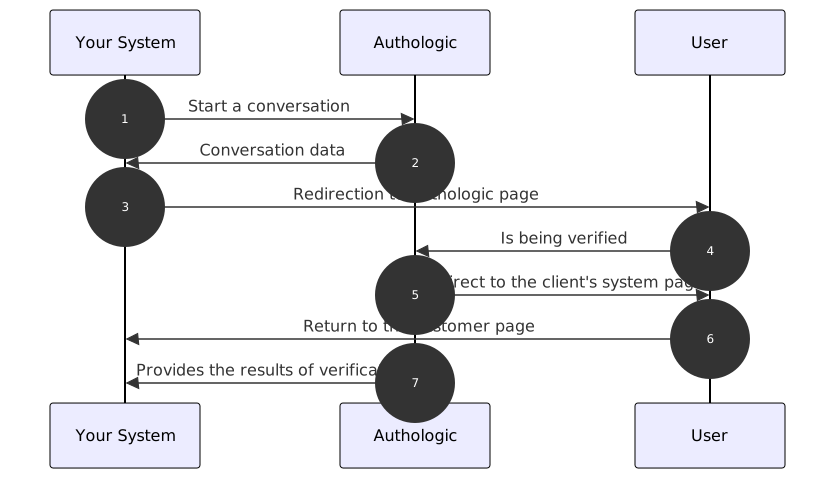
- Start of the identity verification process. Your server calls the API method called: POST /api/conversations
- The response returns information about the address to which the user should be redirected
- Your system redirects the user's browser to the above URL
- The user verifies himself
- Authologic redirects the user's browser to a predefined page of your system
- Your server displays the return page
- Authologic calls a callback on your server's side with the result of the verification
curl tool to show the API operation.
If you have not dealt with it, you can find a short guide on it here(opens in new tab).
Of course, there is nothing to prevent you from using the swagger tool directly, which you will find at the
link: here,
or any other tool, such as Postman or Insomnia.Creating a Conversation
So let's try using the curl tool to start a new conversation, which is the identity checking process.
Basic Auth based authentication described, among others, at
here(opens in new tab). Username and API key should be used as data.
By using the curl tool we use the -u option which is responsible for the use of Basic Auth.curl -X POST -u my_login "https://sandbox.authologic.com/api/conversations" \
-H "Accept: application/vnd.authologic.v1.1+json" \
-H "Content-Type: application/vnd.authologic.v1.1+json" \
-d '{
"userKey": "7dfb9ded-c38f-49ae-95e2-307283a0b1f6",
"returnUrl": "https://id.sandbox.authologic.com/c/{conversationId}/thankYou",
"callbackUrl": "my_callback_url_here",
"strategy": "public:sandbox",
"query": {
"identity": {
"requireOneOf": [
[ "PERSON_NAME_FIRSTNAME", "PERSON_NAME_LASTNAME"]
]
}
}
}'
Of course, instead of my_login enter your login. You should be prompted for a password - at that point you should
enter the API key (do not confuse it with the password to the customer panel).
For my_callback_url_here you could use https://webhook.site/(opens in new tab) to generate callback url which will be responsible for
receiving user information from Authologic. Whether you will use webhook.site or other similar tool it is crucial
that it will correctly receive http request since it is required for the process of identification.
Authologic requires you to provide the API version number by providing them as part of the expected document types.
Therefore, in the query, we used the appropriate Accept and Content-Type headers, thanks to which the server will be
able to choose the appropriate format and API version.
userKey- the field which you can use to provide your own user identification information. Authologic returns this field in the conversation results, but doesn't use the value of the field. It is optional and will be generated for you if omitted.returnUrl- address to which the user will be redirected by Authologic after verifying the identity. It may contain the fragment:{conversationId}- if it exists, it will be replaced with the conversation ID.callbackUrl- after process is completed, on this url we will send you user information or information that process has failed.strategy- information on how Authologic should perform the verification. This field is optional. If not specified, the system will use the default value. In our case, we used thepublic:sandboxstrategy, which does not perform real verification, but allows you to select the result, which is convenient for implementation and integration tests.query- it is the query definition that contains the set of information we want to receive.identity- is the name of the product we want to ask for data.Identityspecifies identity recognition. You will learn about other methods later.requireOneOf- data you want to be specified.
public:sandbox strategy is not available. You can omit the strategy field to
use the default strategy or use another one that we gave you the name of when determining your needs. As a result,
nothing bad will happen, but remember that the production environment requires real data. The collected data will
also be real.For this tutorial we use very simple set of data, but you probably noticed unusual structure of an array of arrays, find why and more detailed explanation: here, full list of available fields: here.
The response should look something like this:
{
  "id": "c12c1adc-3ff0-4d32-b95c-c593135c903e",
  "userKey": "7dfb9ded-c38f-49ae-95e2-307283a0b1f6",
  "url": "https://sandbox.authologic.com/c/c12c1adc-3ff0-4d32-b95c-c593135c903e",
  "status": "CREATED",
  "result": {
    "identity": {
      "status": "IN_PROGRESS",
      "user": {}
    }
  }
}
In the above response we got the following information:
id- the conversation id. We will need it when inquiring about its status.userKey- ID of the user to be checked, exactly what you entered when creating the conversation.url- the address to which the user should be redirected in order to verify the identity.status- conversation status.CREATEDmarks a new conversation where the user has not yet started the verification process.result- conversation result. At the moment we do not have any data, so there appears, within the product for which we asked the status:IN_PROGRESSand an empty structure with data about the user (user)
info. These fields are described separately, and we shouldn't worry about them now.Identity check
The user identity is checked by sending the user to the address returned in the url field.
So now open your browser and go to the page you got in this parameter. You should see the first screen of
the identity checking process. For our sample strategy, it will be a screen where we can enter the
data that the verification is to return.
After going through the process, you should be redirected to the returnUrl page that you entered when creating the conversation.
Getting conversation result
Now let's check the conversation status. You should get request on url that was provided in callbackUrl field during
creating conversation.
{
  "id": "f109ad2b-5e3c-4f9d-b2ea-20379e56f101",
  "created": "2020-12-24T16:00:00.930853456Z",
  "target": "CONVERSATION",
  "event": "FINISHED",
  "payload": {
    "conversation": {
      "id": "c12c1adc-3ff0-4d32-b95c-c593135c903e",
      "userKey": "7dfb9ded-c38f-49ae-95e2-307283a0b1f6",
      "url": "https://sandbox.authologic.com/c/c12c1adc-3ff0-4d32-b95c-c593135c903e",
      "status": "FINISHED",
      "result": {
        "identity": {
          "status": "FINISHED",
          "errors": [],
          "user": {
            "person": {
              "name": {
                "firstName": "Jan",
                "lastName": "Testowy"
              }
            }
          }
        }
      }
    }
  }
}
Conversation Identifier vs Callback Identifier
Please note, that in the above response the top level identifier is the callback identifier, not the conversation identifier. In order to retrieve metadata about the conversation using Authologic APIs, you should use the conversation identifier, which is the id field value that is located in the payload.conversation object.
This time the status has changed to FINISHED, which means the process is complete. At the same time, the result
structure also contains the FINISHED state, which means that all the data was successfully determined. Retrieved
data appeared in the user structure.