Bank Transactions - 5 Minutes Tutorial - Java SDK
Prerequisites
The following information is required to be able to integrate with Authologic:
- Developer portal credentials,
- API Keys.
Developer Portal Credentials
The developer portal address and credentials were provided during onboarding.
Passwords And API Keys
During the onboarding you have received the API keys:
- API key allowing communication with Authologic.
- The key used to verify the data sent by Authologic by the callback mechanism.
Integration Overview
The entire process is called conversation. The following diagram represents the process logical flow:
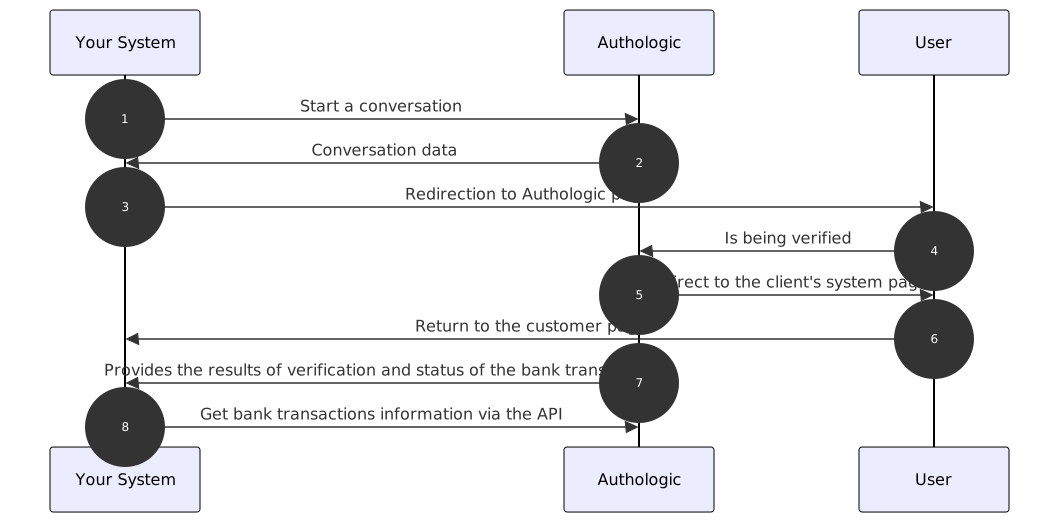
- Start of the identity verification process. Your server calls the API method called: POST /api/conversations
- The response returns information about the address to which the user should be redirected
- Your system redirects the user's browser to the above URL
- The user verifies himself
- Authologic redirects the user's browser to a predefined page of your system
- Your server displays the return page
- Authologic calls a callback on your server's side with the result of the verification and the status of the bank transactions
- After the callback with bank transaction status
FINISHEDis received your system may start fetching the bank transactions via the API
One API for multiple online identity verification methods written in Java.
Installation
The installation of the library is as simple as including it as one of the projects dependencies.
We encourage to use the newest version of the library as we are constantly expanding our product offering and the underlying functionalities.
Maven
Include the following dependency in your pom.xml file to use Authologic Java SDK:
<dependency>
    <groupId>com.authologic.client</groupId>
    <artifactId>authologic-client</artifactId>
    <version>0.2.42</version>
</dependency>
Gradle
Include the following dependency in your build.gradle file to use Authologic Java SDK:
implementation("com.authologic.client:authologic-client:0.2.42")
Usage
The following example demonstrate an example on how you can use the Java SDK to interact with the Authologic APIs.
Creating Conversation
To start a new conversation process, which is the main entry point for the identity checking product the following example can be used:
import com.authologic.client.api.*;

import java.util.Arrays;

public class Main {
    public static void main(String[] args) {
        Client client = ClientBuilder.builder("username", "password").sandbox().build();

        Conversation conversation = client.execute(
            Requests.
                createConversation().
                strategy("public:sandbox").
                callbackUrl("some_callback_url").
                addProduct(
                    new IdentityProductQueryBuilder(
                        Arrays.asList(
                            IdentityQueryField.PERSON_NAME_FIRSTNAME,
                            IdentityQueryField.PERSON_NAME_LASTNAME
                        )
                    )).
                addProduct(
                    new BankTransactionsProductQueryBuilder()
                )
        ).get();

        System.out.println(conversation.getUrl());
    }
}
Creating the Client Instance
We start by creating the Client instance:
Client client = ClientBuilder.builder("username", "password").sandbox().build();
API credentials can be generated via OmniPanel.
Because the API is secured you need the provided credentials to be able to interact with it.
Once initialized the Client instance may be used to interact with the Authologic API.
Creating the Conversation
Next we can create the conversation and request the first and last name of the person we are
requesting the identification for. For that purpose we use the Requests.createConversation()
using the following code snippet:
Requests.
    createConversation().
    strategy("public:sandbox").
    callbackUrl("some_callback_url").
    addProduct(
        new IdentityProductQueryBuilder(
            Arrays.asList(
                IdentityQueryField.PERSON_NAME_FIRSTNAME,
                IdentityQueryField.PERSON_NAME_LASTNAME
            )
        )
    ).
    addProduct(
        new BankTransactionsProductQueryBuilder()
    )
We set:
- the strategy
- the callback URL
- the products that we want to use.
The strategy is the information that tells Authologic how to perform the operation.
The field is optional, but you can explicitly provide the information to choose the strategy that
you want to use. In the above example we used the public:sandbox, a strategy which doesn't perform a
real verification, but allows to test the whole flow.
The callback URL is the URL that Authologic will send the user when the process, in our example case the identification process, will be completed. You should set it to match return to your application or use a service like Webhook Site(opens in new tab) if you plan on testing the SDK.
The products that we want to use in this example are the identity product and the bank transactions product.
For the identity product we use the IdentityProductQueryBuilder class and provide the list of
fields to retrieve:
new IdentityProductQueryBuilder(
    Arrays.asList(
        IdentityQueryField.PERSON_NAME_FIRSTNAME,
        IdentityQueryField.PERSON_NAME_LASTNAME
    )
))
For the bankTransactions product we use the BankTransactionsProductQueryBuilder class:
addProduct(
    new BankTransactionsProductQueryBuilder()
)
As the final step we print the URL of the created conversation to the standard output to be able to continue the process. If you are trying out the SDK head to the returned link to fill out the data that will be returned as test data for your identity verification test.
Working with Callbacks
#include "./java-sdk-callbacks-imports.md"
The Java SDK can also be used to parse the information sent to your callback URL. It is as simple as initializing one of the JSON parsing engines, deserializing the body of the request received in the callback and using the result data. For example this is how the code could look like:
JsonEngine jsonEngine = (new JacksonJsonEngineProvider()).createJsonEngine();
Callback callback = jsonEngine.deserialize(callbackBody, Callback.class);

if (callback.isConversationFinished()) {
    Conversation conversation = callback.asConversationFinished().getConversation();
    if (conversation.getResult().getBankTransactions().getStatus() == ProductResultStatus.FINISHED) {
        // TODO: schedule bank transactions fetching
    }
}
Let's discuss the above example.
Initializing JSON Parser
We start by initializing the JSON parser, so we can easily parse the response. We do it only once as the parser is thread-safe and can be reused later when needed:
JsonEngine jsonEngine = (new JacksonJsonEngineProvider()).createJsonEngine();
Deserializing the Results
We assume that we got the callback body and stored i tin the callbackBody variable. Once we have it
we can easily deserialize it to the CallbackResult class using the initialized JSON parser:
Callback callbackResult = jsonEngine.deserialize(ctx.body(), Callback.class);
The abstract Callback class provides two methods to identify the type of the result:
- the
isConversationFinishedreturningtrueif the result is of typeConversationrepresenting conversation - the
isUnknownCallbackreturningtrueif the result is of typeUnknownCallbackrepresenting unknown callback
In the example code we expect the FinishedConversationCallback, so we check for it:
if (callback.isConversationFinished()) {
After we verified that we got the class we were expecting we can retrieve the conversation from the deserialized object and check whether the bank transactions are ready and if they are, we can schedule fetching of the bank transactions via the dedicated API:
Conversation conversation = callback.asConversationFinished().getConversation();
if (conversation.getResult().getBankTransactions().getStatus() == ProductResultStatus.FINISHED) {
    // TODO: schedule bank transactions fetching
}